Lab 3: Data in Production
Setup
To setup your cloud-based development environment create an account using your email at http://rstd.io/class with code devops_workshop. Click on the Rstudio Connect widget to start your environment.
Part 1: Host API on Posit Connect
- Go to the Solutions Engineering R-examples repo and copy the HTTPS url.
- In Connect click
PublishandImport from Git. Enter the URL that you copied above and click Next. - Select the main branch and click next.
- Select the
plumber-penguins/appdirectory and give it a name. - Click `Deploy Content. In a few moments your API should be live!
Part 2: Explore your API
- Explore the endpoints for the API. Click the
GETfor each endpoint and then clickTry it outandExecute. - Click on the link ending in openapi.json below the title of you API.

- Try accessing the API via the terminal with
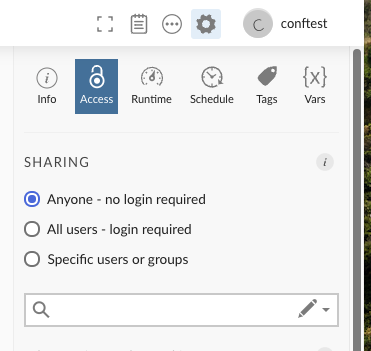
curl <URL>. You should receive output that the app is not authorized! - Authorize the app for everyone by changing the Access > Sharing option to
Anyone - no login requiredand then try the curl command again. It should work now!

- Try out the /penguins endpoint and grab the Request URL.
- Access the /penguins endpoint and provide input for the sample size in your terminal and in the app itself.
curl "<REQUEST URL>/penguins?sample_size=5"
Part 3: Plumber Examples
- Install the plumber examples package.
remotes::install_github("sol-eng/plumberExamples") - Run
available_apisto see plumber examples in the package. - Access examples and code:
library(plumber)
plumb_api(package = "plumberExamples", name = "00-hello") %>% pr_run()
Part 5: Programmatically access Connect
- We want to programmatically identify all the content that has been published. You will need to use the Connect API Key that you created in the earlier lab. Or you can create a new key.

- Open a new R script In your workbench console. Add your Connect information:
# Add server
rsconnect::addServer(
  url = "https://liberal-bullfinch.74633.fleeting.rstd.io/rsconnect/__api__",
  name = "colorado"
)

# Add account
rsconnect::connectApiUser(
  account = "",
  server = "colorado",
  apiKey = Sys.getenv("CONNECT_API_KEY"),
)- Access your content programmatically in R: - need to add key ias env variable
library(httr)
library(tidyr)

# Use the /v1/content endpoint to retrieve the full list of content items
result <- GET(
  paste0(Sys.getenv("CONNECT_SERVER"),"__api__/v1/content"),
    add_headers(Authorization = paste("Key", Sys.getenv("CONNECT_API_KEY"))))

# Create a tibble for the content list result response
df_full <- unnest_wider(tibble::tibble(dat = content(result)), dat) - Access your content programmatically in the terminal using curl:
export CONNECT_API_KEY=XXX
export CONNECT_SERVER=https://liberal-bullfinch.74633.fleeting.rstd.io/rsconnect/

curl --silent --show-error -L --max-redirs 0 --fail \
    -H "Authorization: Key ${CONNECT_API_KEY}" \
    "${CONNECT_SERVER}__api__/v1/content"